Butterscotch Blondies with Smoked Almonds & Sea Salt

I have a hazy memory of a Saturday afternoon with my father and little sister, standing in line at Dairy Queen.  It’s one of those memories that has a cloudy, golden overlay - the kind that makes it impossible to see the fine details of the day, leaving only the general picture for reminiscing.  I am pretty sure we were wearing bathing suits, which means that a day of fishing had likely taken place beforehand.  There we stood, waiting in line for free ice-cream cones that were being handed out to all of us very hot, dairy-loving Virginians.

Butterscotch Blondies with Smoked Almonds & Sea Salt {Pedantic Foodie}

For some reason, I must have been feeling adventurous that day because I forsook my beloved chocolate-dipped cone for a butterscotch encased cone of fluffy ice cream.

Looking back, I am sure that this once-heavenly cone was not as revolutionary as my eight-year-old mind imagined it to be, but at that time, on that hot day - it was perfect.

Butterscotch Blondies with Smoked Almonds & Sea Salt {Pedantic Foodie}

Aside from its role in that singularly perfect cone and its nostalgic qualities, butterscotch does not often cross my mind.

Butterscotch Blondies with Smoked Almonds & Sea Salt {Pedantic Foodie}

However, after a request from my fiancé, I figured it was time for butterscotch to reenter my life.  

Butterscotch Blondies with Smoked Almonds & Sea Salt {Pedantic Foodie}

Of course, I could have simply poured this sweet butterscotch sauce over vanilla ice cream and called it a day, but this is the weekend and we have time to be a little fancy.

Butterscotch Blondies with Smoked Almonds & Sea Salt {Pedantic Foodie}

Blondies need baking makeup.  Unlike their chocolatey cousin, blondies just don’t do it for me on their own, so I poured a pan of butterscotch and a handful of smokey, salty almonds on top.  It seemed like the right thing to do. 

4-2706.jpg

I’ve been wondering what my eight-year-old self would have thought of smoked almonds.  She likely would have been unimpressed and asked for the honey-glazed peanuts instead.  The things I didn’t know…

Butterscotch Blondies with Smoked Almonds & Sea Salt {Pedantic Foodie}

Something about the combination of smoked almonds and butterscotch is magical.  The geek in me is seriously thinking about trying to smoke cream for a smoked vanilla ice cream that I could pair with this sauce.  Hmm. Definitely putting that one on the list.

Butterscotch Blondies with Smoked Almonds & Sea Salt {Pedantic Foodie}

These blondies are super easy.  Like, you could make them with your five year old, and you should…unless they have tendencies to eat flour like my little cousins used to, then maybe you should just bake during nap time.

What do I know about kids?  Not much.  But, I’m good at feeding them sugary things, which makes up for all other shortcomings -- at least that’s what I tell myself. 

Butterscotch Blondies with Smoked Almonds & Sea Salt {Pedantic Foodie}

Melted butter and brown sugar gives these blondies a rich, buttery foundation that keeps them soft and chewy.  I tested these little darlings twice.  The first time I used baking powder, and bleh.  They were cakey and crumbly and just…really bad.  For the second batch, I used baking soda and they were perfect!  That, my friends, is the powering of leavening. 

Butterscotch Blondies with Smoked Almonds & Sea Salt {Pedantic Foodie}

No beating required, just a wooden spoon and a strong arm. 

Butterscotch Blondies with Smoked Almonds & Sea Salt {Pedantic Foodie}

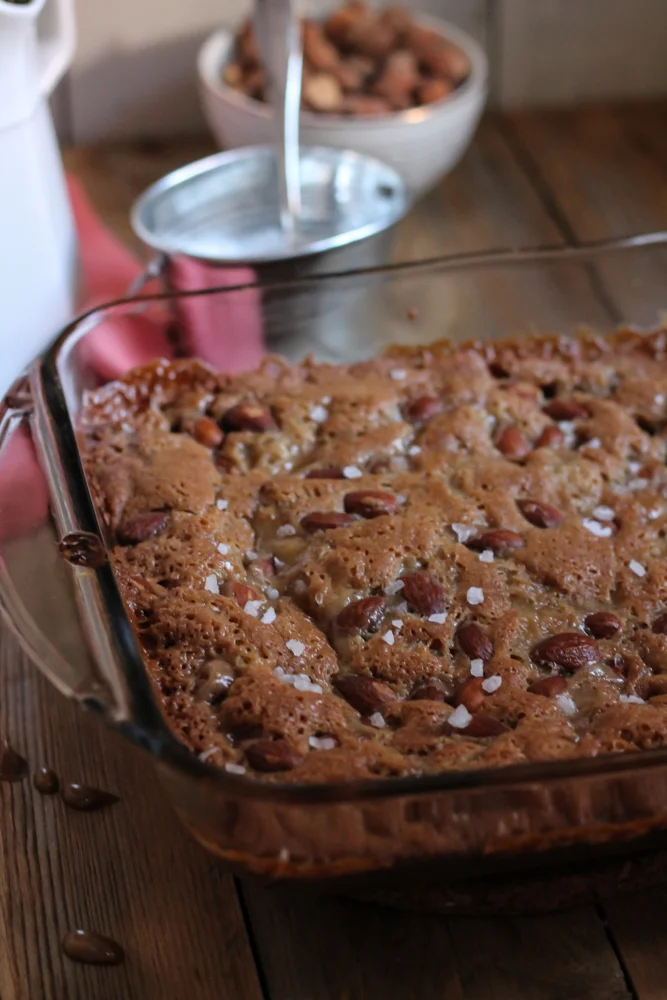
Drizzled with butterscotch, sprinkled with almonds and we are almost done!  Pour yourself a glass of milk and set the oven timer.  

Butterscotch Blondies with Smoked Almonds & Sea Salt {Pedantic Foodie}

Simple and sophisticated, salty and sweet - and there you have it, blondies have more fun.

Butterscotch Blondies with Smoked Almonds & Sea Salt {Pedantic Foodie}

Bye!

Sincerely, 

Pedantic Foodie


Butterscotch Blondies with Smoked Almonds & Sea Salt

makes 9 / butterscotch recipe adapted from Deb Perelman

for the butterscotch

  • 2 tablespoons unsalted butter
  • 1/4 cup brown sugar 
  • 1/4 teaspoon salt 
  • 1/4 cup heavy cream 
  • 1/2 teaspoon vanilla extract 

Melt butter in a small saucepan over medium heat.

Once the butter has melted, whisk in brown sugar, salt, and heavy cream.  Bring to a slow boil and cook for five minutes.

Remove from heat and stir in vanilla extract.  Allow to cool while you prepare the blondie batter. 

for the blondies

  • 1 large egg 
  • 3/4 cup brown sugar 
  • 1/2 cup unsalted butter, melted 
  • 1 1/4 cup all-purpose flour 
  • 1/2 teaspoon salt 
  • 1/2 teaspoon baking soda 
  • 1/3 cup smoked almonds 
  • sea salt 

Preheat oven to 375 degrees.

In a large bowl, whisk to combine egg and brown sugar.  Whisk in melted butter.  

Sift to combine flour, salt, and baking soda.  Add the dry ingredients to the egg mixture and whisk to combine.

Grease an 8-inch baking pan and spread the batter evenly into the pan.  Drizzle with prepared butterscotch sauce and use a small spatula to swirl the sauce through the top of the batter.  Sprinkle smoked almonds on top of the blondies and press the almonds gently into the batter.  Sprinkle lightly with sea salt.  

Bake for 15-20 minutes, until the edges are golden brown and the center looks almost set, but still slightly underdone.  

Allow the blondies to cool for 15-20 minutes before cutting and serving.  Enjoy!

Croque Mon - Do What I Want

Welcome to this Monday.  It’s already happening, another week, another to-do list, another round of appointments - don't panic.  

You can do this.  

Your hair looks amazing, by the way.

Croque Mon - Do What I Want {Pedantic Foodie}

We need to begin this week right, so eat a proper breakfast.  Yes, of course, yogurt counts, especially if you splurged on the fancy European chocolate kind - you’re totally winning.  

The work day and full inbox will likely feel daunting, and you’ll be tempted to come home and crash on the couch with a bowl of leftover popcorn.  But, you are not going to do that.  Instead, you should call up your favorite gentleman or lady, and make a cozy, slightly-more-elegant-than-popcorn dinner.  You’ll thank yourself.  

Croque Mon - Do What I Want {Pedantic Foodie}

I’m trying to gather up some of these weeknight dinner weapons because in 235 days I’m going to have a husband.  One of those studly garbage-taker-outers that you have to feed three times a day and provide semi-frequent back rubs for - at least that’s what I’ve heard.  So you see, my classic popcorn and clementine dinners simply won’t do anymore...except maybe on Sunday nights, everything is permissible on Sunday nights.

So this is why I’m learning to make fancy sandwiches that need only a pile of lightly dressed arugula and a handful of chips to become a proper dinner.

Croque Monsieur is the classic French sandwich.  It is little more than a very fancy version of ham and cheese.  By fancy, I mean that it has ooey, gooey (bleh, I don’t like those words… someone please, give me some new adjectives) cheese sauce poured over it.  

It consists of two slices of toasted bread, a thin layer of dijon, ham, and gruyere.  The finished sandwiches are then covered in a rich cheese sauce and baked until the cheese gets brown and bubbly.  I love it, and it really needs no improving, but, I wanted pickles.   

I really love a good sweet pickle.  My dad and I are the only ones in my family that tolerate their charm, and I cannot get enough.  One of my very favorite guilty pleasure foods is a good hot dog with tangy ketchup and a heaping pile of sweet pickles. Oh yes…  But I digress.

Croque Mon - Do What I Want {Pedantic Foodie}

So, for the love of pickles, I defied tradition and added a layer of sweet pickles.  Let me tell you, that though this sandwich has always been perfect on its own, if perfection could be improved upon - this is it.  

The spicy mustard plays wonderfully with the sweetness of the pickles and they add a fresh crunch to the rich, cheese-blanketed sandwich.  

Croque Mon - Do What I Want {Pedantic Foodie}

Husband or no husband, this is a really good Monday night dinner choice.  And, if you are dining solo and do not feel like eating four sandwiches, you can still make the entire batch of cheese sauce and stow it away in the refrigerator for quick lunches or dinners. 

Croque Mon - Do What I Want {Pedantic Foodie}

We’ve got serious weeknight skills. 

Croque Mon - Do What I Want {Pedantic Foodie}

Sincerely, 

Pedantic Foodie


Croque Mon - Do What I Want

makes 4 / recipe adapted from Ina Garten

- 8 1/2-inch slices of good bread (I used an Italian country loaf)

- 2 tablespoons unsalted butter 

- 3 tablespoons all-purpose flour 

- 2 cups whole milk, warmed (about 60-70 degrees)

- 1 teaspoon salt

- freshly ground black pepper 

- 1/8 teaspoon freshly ground nutmeg 

- 1 teaspoon salt

- 1 1/2 cups gruyere, shredded (divided use)

- 1/2 cup finely grated parmesan + extra for sprinkling 

- 16 slices deli ham

- 1 cup bread and butter pickle slices 

- dijon mustard

Preheat oven to 400 degrees F.  

Place the sliced bread on a sheet pan and bake for 5 minutes.  Flip each slice and then bake for an additional 2 minutes, until toasted.  

Place butter in a small saucepan and melt over medium high heat.  Once the butter has melted, whisk in flour.  Cook, whisking often for 2 minutes. 

Slowly stream in warm milk, whisking constantly, until combined.  Add salt, pepper, and fresh nutmeg and cook, stirring often, until the sauce has thickened; about 3-5 minutes. 

To test the consistency, dip a spoon into the sauce and run your finger down the center of the spoon.  If it leaves a clean line, the sauce has thickened enough; if not, keep cooking.  

Remove from heat and stir in 1/2 cup gruyere and parmesan.  Set aside. 

Set oven on the broiler setting.  

Spread a thin layer of mustard on four of the toasted slices of bread.  Layer each slice with pickles, four slices of ham, and a handful of the remaining gruyere.  Top with a second slice of toast and place in a 9x13 baking pan.  Cover each sandwich with prepared sauce and sprinkle with parmesan. 

Broil for 3-5 minutes, until the sauce is bubbling and slightly browned.  Serve immediately.  Enjoy!  


You may also like...

A Challenge to Self - Pierogies

How are you handling the February funk?  Something about this month always makes me want to hibernate.  To crawl under a blanket and alternate between napping, re-watching all the seasons of Downton Abbey, and eating anything warm, comforting, and (preferably) cheesy, that I can get my hands on.

A Challenge to Self - Pierogies {Pedantic Foodie}

Though it is often the last thing I feel like doing on these grey, the-weather-can’t-make-up-its-mind-again kind of days, it is important to keep myself busy.  Busy with projects, challenges, and new friends, because even though I want to flake on all of it SO BADLY, when I can muster up the courage to get some real work done, I always feel better.  Even if that work simply translates to finally tackling a new recipe you have been putting off for several years.

A Challenge to Self - Pierogies

Last year, I spent most of the winter weekends trying to nail down my favorite macaroni and cheese recipe.  With the help of my fiance and brother, we turophiles created what I believe is one of the very best macaroni and cheese renditions.  This year, I challenged myself to conquer all things dumplings, beginning with one of my favorite dumplings - the pierogi. 

I researched and schemed before attempting my very own pierogies, which, to my amazement, were far simpler than I had imagined.  In truth, I was rather embarrassed by the fact that I had allowed such a simple dumpling to intimidate me for so many years.  

A Challenge to Self - Pierogies {Pedantic Foodie}

In my research and testing process, I learned several things…  

1. Sour cream is important for a soft, delicate dumpling dough.  

2. Do not underfill the dumplings.  I was leery of over-stuffing my dumplings in the beginning, but the dough can handle a lot more filling than I gave it credit for, so be sure to get your pierogies plump with filling. 

3. Keep your dough moist.  This recipe makes about 21 pierogies, and filling and shaping them is definitely the most time-consuming portion of the process.  The dough will easily become sticky and crusty if it is not kept moist, so place the dough that is not yet being shaped on a very well-floured surface and cover with a damp paper towel until you are ready to use.  

4. Get your filling smooth.  Like, super smooth.  You’ll thank yourself in the end. 

A Challenge to Self - Pierogies {Pedantic Foodie}

We begin by making the dough.  It's a super-simple, non-yeasted dough that comes together with a wooden spoon and a good bit of kneading.

A Challenge to Self - Pierogies {Pedantic Foodie}

While the dough rests, potatoes are peeled and boiled in super salty water because you would never, ever, ever consider boiling potatoes without salting the water, right?  Of course you wouldn’t.  

A Challenge to Self - Pierogies {Pedantic Foodie}

Once the potatoes are fork-tender, they are smashed with butter, sour cream, milk, and a whole lot of gruyere.  

Then, the potatoes are put through a fine mesh sieve to make them extra smooth and creamy.  If mousse and mashed potatoes had a child, it would be this filling.  Try very hard not to eat it all before you fill the pierogies. 

A Challenge to Self - Pierogies {Pedantic Foodie}

Once the dough has rested, it is rolled and shaped into circles.  

A heavy spoonful of filling is placed in the center of each circle of dough, and then the dough is folded over and the edges are pinched to form the dumpling. 

A Challenge to Self - Pierogies {Pedantic Foodie}

These dumplings go directly into a pot of simmering, salted water to cook for 8 minutes.  

A Challenge to Self - Pierogies {Pedantic Foodie}

While the dumplings are simmering, heat several tablespoons of butter in a frying pan.  The cooked pierogies go directly into the hot butter to fry until the edges are golden brown and crispy.  

A Challenge to Self - Pierogies {Pedantic Foodie}

I’m unreasonably excited about these dumplings.  Carbs filled with carbs = happy lady. 

A Challenge to Self - Pierogies {Pedantic Foodie}

Oh, bikini season is coming?  Get outta here with that negativity. 

A Challenge to Self - Pierogies {Pedantic Foodie}

Fight the funk and make pierogies.  

Sincerely, 

Pedantic Foodie


Potato & Gruyere Pierogies 

makes 21 / recipe adapted slightly from Emeril

for the dough

- 2 1/4 cups all-purpose flour + 1/4 cup for dusting 

- 1/2 teaspoon kosher salt

- 1/2 cup water 

- 1 egg 

- 2 tablespoons olive oil 

- 2 tablespoons sour cream

Combine salt and flour in a large bowl; set aside. 

In a large measuring cup, whisk to combine water, egg, oil, and sour cream.  Pour the wet ingredients into the dry ingredients and use a wooden spoon to stir.  Mix until a rough dough has formed and then transfer to a well-floured surface.  Knead for 3-5 minutes, until the dough is smooth and elastic.  Shape the dough into a ball and dust lightly with flour.  

Cover the dough with a damp paper towel and allow to rest for 30 minutes.  While the dough is resting, prepare the filling. 

for the filling

- 4 medium yukon gold potatoes, peeled and cut into cubes 

- 3 tablespoons unsalted butter 

- 1/2 teaspoons kosher salt 

- freshly ground pepper

- 6 tablespoons whole milk, at room temperature 

- 1 1/2 cups shredded gruyere

Fill a medium saucepan with water, seasoned with a palmful of kosher salt.  Add potatoes and place over high heat.  Bring to a boil.

Boil for 15-20 minutes, until fork tender.  

Drain away the water and add butter, salt, and pepper.  Mash roughly with a potato masher before adding milk and gruyere.  

Stir until the cheese had melted and the potatoes are fairly smooth.

Press the potatoes through a fine mess sieve to create a smooth, potato puree.  

assembly & frying

-  1/4 cup unsalted butter

Shape the dough into a rectangle - 6 inches long, by 5 inches wide.  Cut the rectangle into three strips, about 1.75 inches wide.  Then, cut each strip into 7 equal pieces, leaving you with 21 small squares of dough.  Roll each piece into a small ball. 

Place the dough on a very well-floured surface and keep covered with a damp paper towel until ready to use.  

Flatten each ball with the palms of your hands and stretch to form a 3-inch circle.  Place about 1 1/2 tablespoons of the potato filling in the center of each round of dough.  Fold the dough over on itself to form the dumplings, pinching to seal the edges.  Place the finished dumplings on a baking sheet lined with parchment and cover with damp towel until all the dumplings are shaped. 

Fill a large pot with water and salt liberally.  Bring to a simmer over medium heat.  

Working in several batches, drop dumplings into the simmering water and cook for 8 minutes.  

Use a slotted spoon to remove the cooked dumplings from the pot and set aside.  At this point, the dumplings can be refrigerated until ready to use.  

To serve:  Place one tablespoon of butter in a medium frying pan and melt over medium heat.  When the butter begins to bubble, add several of your cooked pierogies to the pan and cook for 3-4 minutes on each side; until they are golden brown and the edges are crisp.  

Serve immediately.  Enjoy!


You may also like...