Mama's Pumpkin Roll

There is one smell that is better than any other smell on earth, and that is the fragrance of a homemade pumpkin roll. 

Mama's Pumpkin Roll {Pedantic Foodie}

My mama and her sisters have always been industrious.  They are three of the most crafty, artistically-talented people you will ever meet.  Each of their homes is uniquely beautiful, and our family events are characterized by incredible food and the most Pinterest-worthy of decorations.

Mama's Pumpkin Roll {Pedantic Foodie}

Not one of them was ever what you would call a "career woman," but they helped to provide for their young families by using their innate talents.

Mama's Pumpkin Roll {Pedantic Foodie}

When I was a very eager-to-help, little girl, my mother and her sisters would make literally hundreds of pumpkin rolls.  Like, we are talking six hundred pumpkin rolls.  

There were so many wonderful parts about living in a pumpkin roll factory - the smells, the dabs of cream cheese frosting here and there, but, the very best part was undoubtably the ends. 

The ends of even the best-baked pumpkin roll always look a little on the shriveled side, but their deliciousness is by no means compromised.  For quality control purposes, the three sisters would always lop off these ends, leaving them for me and my father to tirelessly taste-test.  It was rough. 

They would carry their coolers full of these autumn pinwheels to the local high schools during the early hours of a November Saturday, and would be hanging their "sold out" sign before the craft show had come to a close. 

Mama's Pumpkin Roll {Pedantic Foodie}

These days, their children are older and they no longer make hundreds of pumpkin rolls, but the occasional, orange, roll will still appear at a family dinner or birthday now and then.  

Mama's Pumpkin Roll {Pedantic Foodie}

While I tried to keep my hands out of the food preparations for my recent wedding, I coaxed my mother into making pumpkin rolls with me for the big day.  

One of the best parts about pumpkin rolls is that they freeze incredibly well.  After our day of baking, there were stacks of these rolls in my mother's freezer and it was like having a glimpse into the past. 

Mama's Pumpkin Roll {Pedantic Foodie}

Though they are, without a doubt, one of my favorite desserts, I had never made a pumpkin roll before. 

I asked my mother to pull out that one familiar cookbook and teach me the ins and outs of pumpkin roll-baking. 

Mama's Pumpkin Roll {Pedantic Foodie}

Here is what I learned.

1. My mother breaks a lot of baking rules.  

Mama's Pumpkin Roll {Pedantic Foodie}

2. Her rolls seem to turn out anyways.  How, I do not know, but she manages to turn out a very solid pumpkin roll, time after time. 

Mama's Pumpkin Roll {Pedantic Foodie}

3. Greasing is nonnegotiable.  You must lubricate your pan before the batter is poured. 

Mama's Pumpkin Roll {Pedantic Foodie}

4.  Rolling the pumpkin roll while it is still hot and malleable will keep it from cracking when the time comes for frosting. 

5. Cream cheese frosting is the best.  

Just kidding, I had already learned that long ago. 

Mama's Pumpkin Roll {Pedantic Foodie}

As I helped my mother bake, carefully noting and documenting her techniques, Lady (my parent's newest addition to the family) watched patiently by, waiting for scraps.  I understood her agony all too well. 

Mama's Pumpkin Roll {Pedantic Foodie}

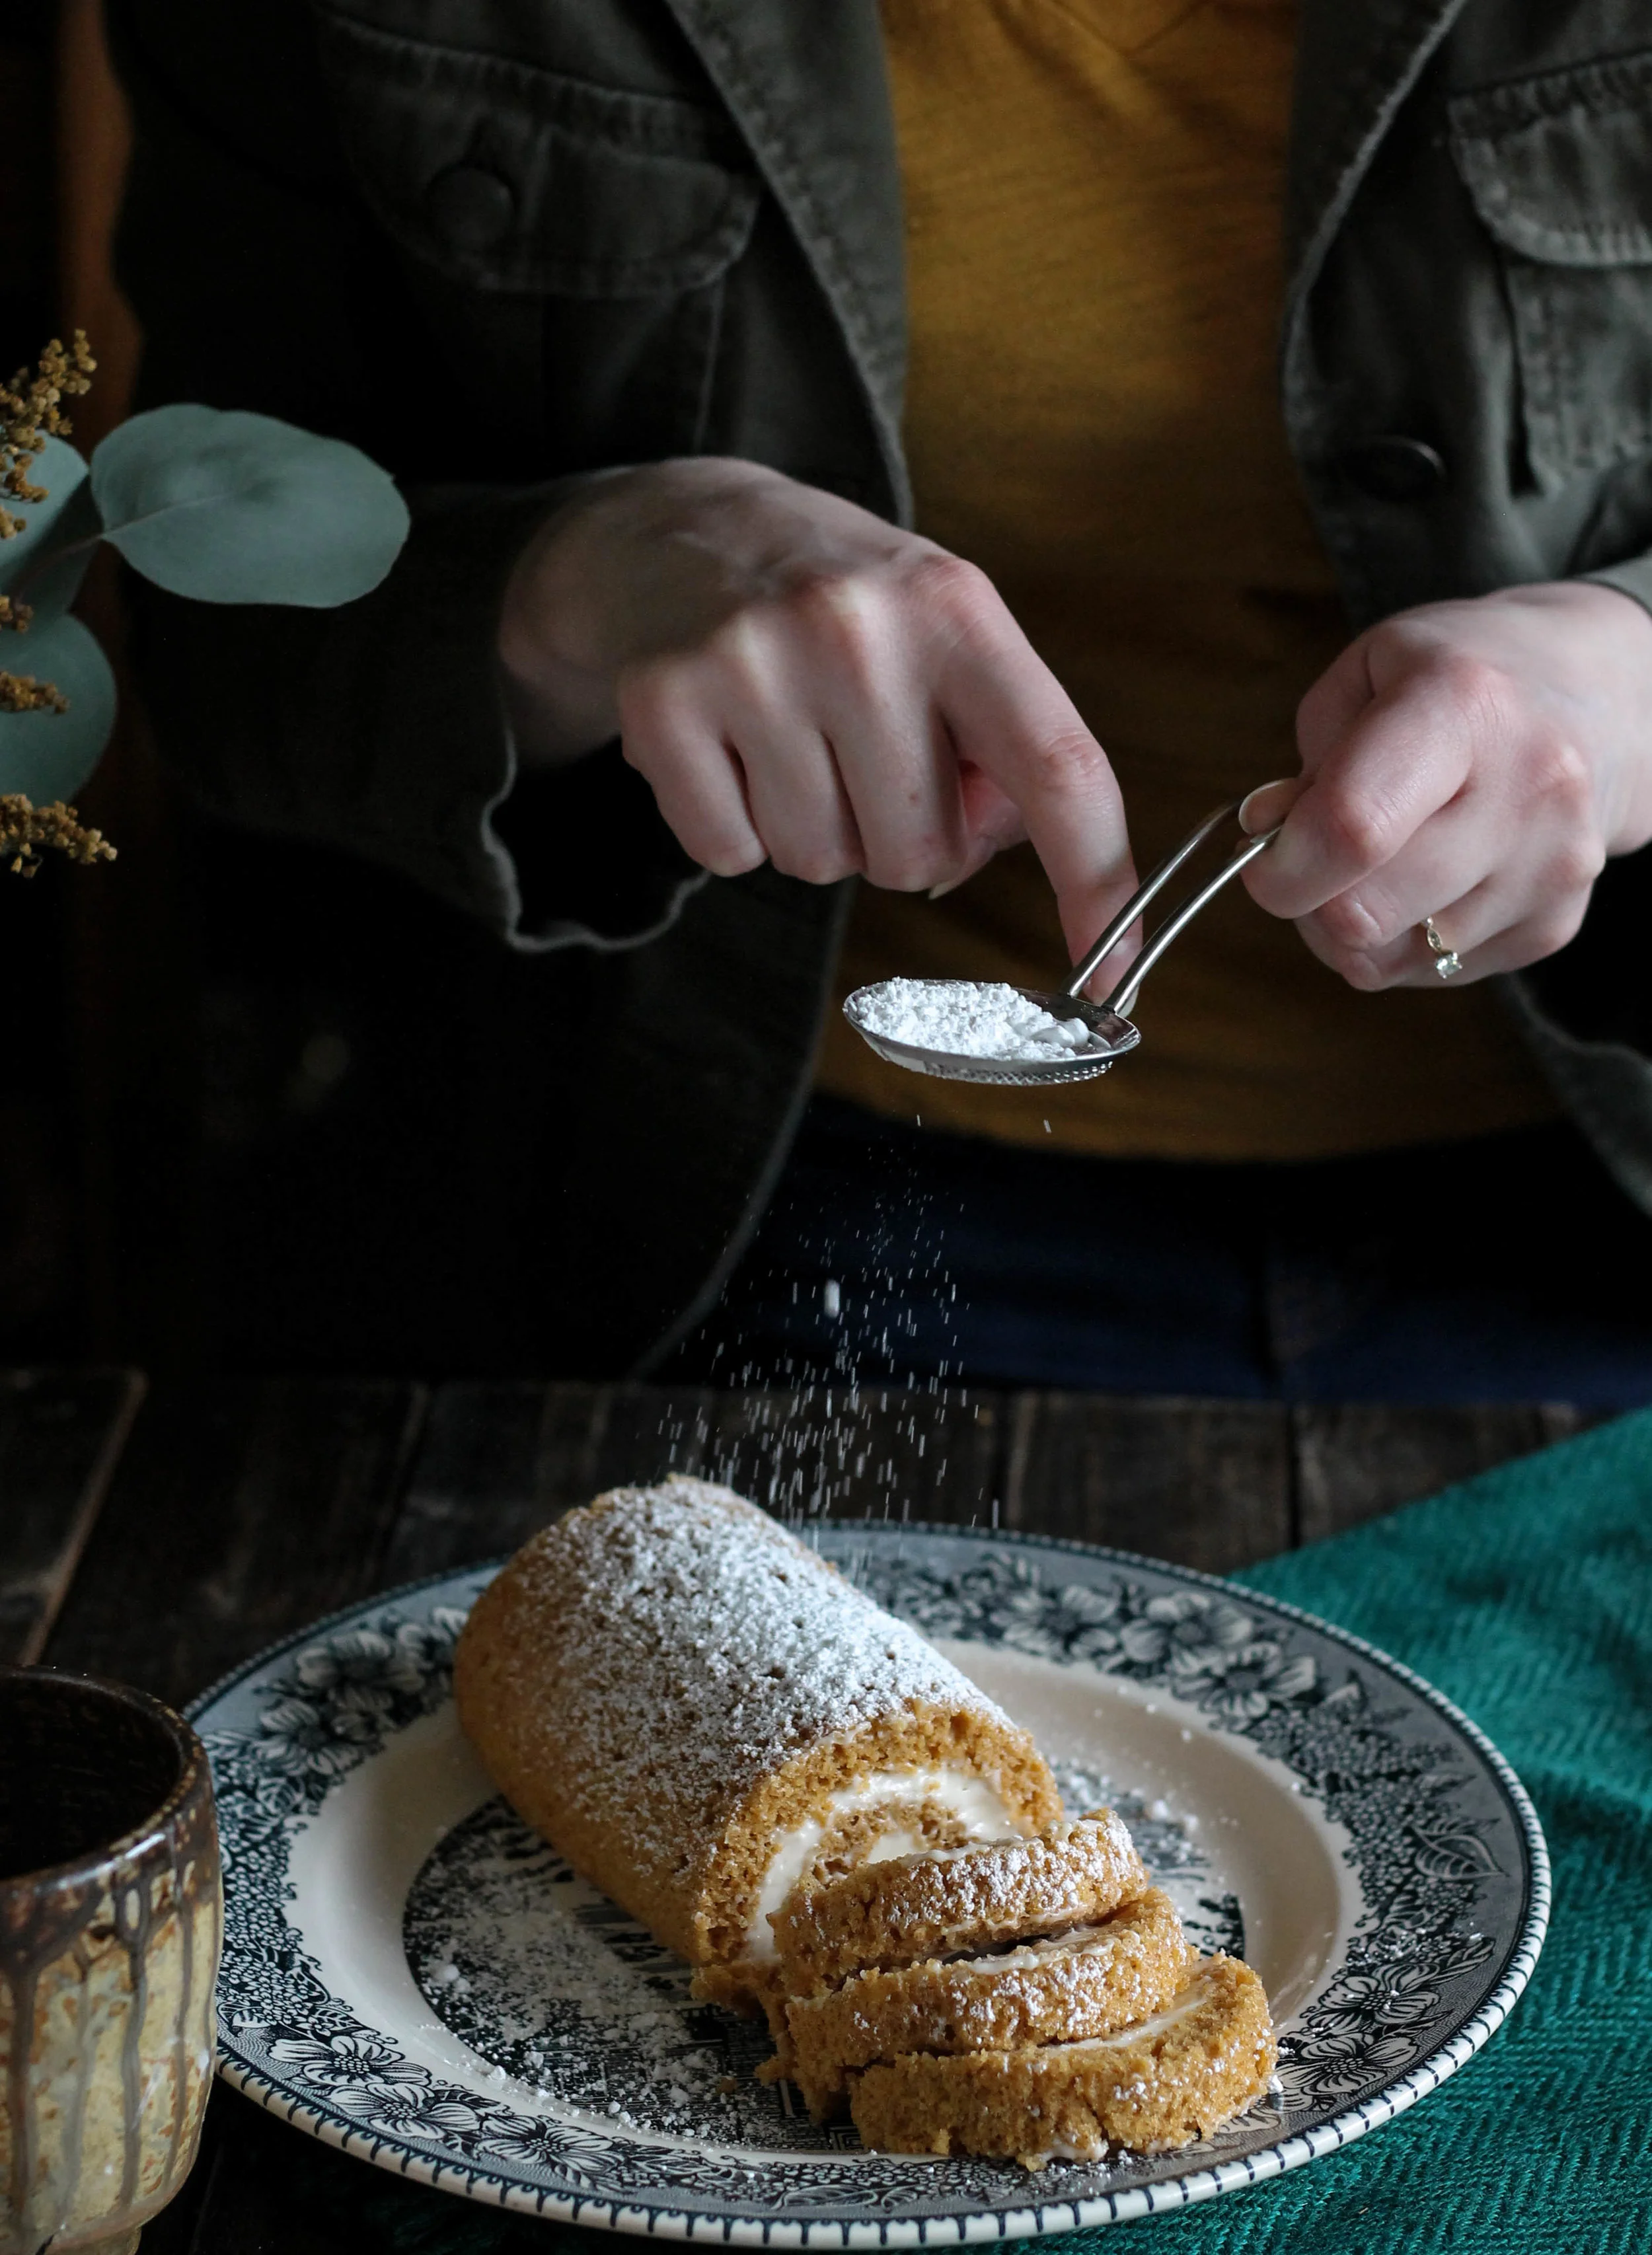
Though it be a classic, and rather foreseeable move, in my mind, a pumpkin roll is not a pumpkin roll without a heavy sprinkling of confectioner's sugar.

Mama's Pumpkin Roll {Pedantic Foodie}

The kitchen was filled with the fragrance of something delicious that afternoon, but something far sweeter wafted from its walls - the remembrance of happy times gone by.

Sincerely, 

Pedantic Foodie


Mama’s Pumpkin Roll

makes 1 large pumpkin roll / recipe adapted from my Mama’s very old copy of Pioneer Potpourri

for the pumpkin roll

- 3 eggs 

- 1 cup granulated sugar

- 2/3 cup pumpkin puree

- 3/4 cup all-purpose flour

- 1 teaspoon baking powder

- 2 teaspoons ground cinnamon 

 - 1/2 teaspoon salt

Preheat oven to 375 degrees. 

Sift to combine flour, baking powder, ground cinnamon, and salt. 

In a very clean bowl, beat eggs with an electric mixer on high speed for 5 minutes.  While continuing to mix, slowly incorporate sugar and pumpkin. 

Gently fold the sifted flour into the pumpkin mixture.  Mix well, being watchful to fully incorporate all of the flour mixture. 

Line a 10x15-inch baking sheet with aluminum foil and grease liberally with nonstick spray.

Pour the batter onto the baking sheet and bake for 15 minutes.  The edges should be golden brown.  While the roll is baking, line your countertop with paper towels. 

Flip the hot pumpkin roll out onto the paper towels and roll up into a spiral, working lengthwise.  This will conform the cake to the proper shape and prevent it from cracking later on. 

Allow the roll to cool completely while you prepare the frosting.

for the cream cheese frosting

- 4 tablespoons unsalted butter

- 6 ounces cream cheese, softened

- 1 cup confectioner’s sugar, plus extra for serving

- 1/2 teaspoon vanilla

In the work bowl of your stand mixer, combine butter and cream cheese.  Whip on medium high speed for 1 minute; until fluffy.  Reduce the speed to low and slowly sift in the confectioner’s sugar. 

When all the sugar has been incorporated, add the vanilla. 

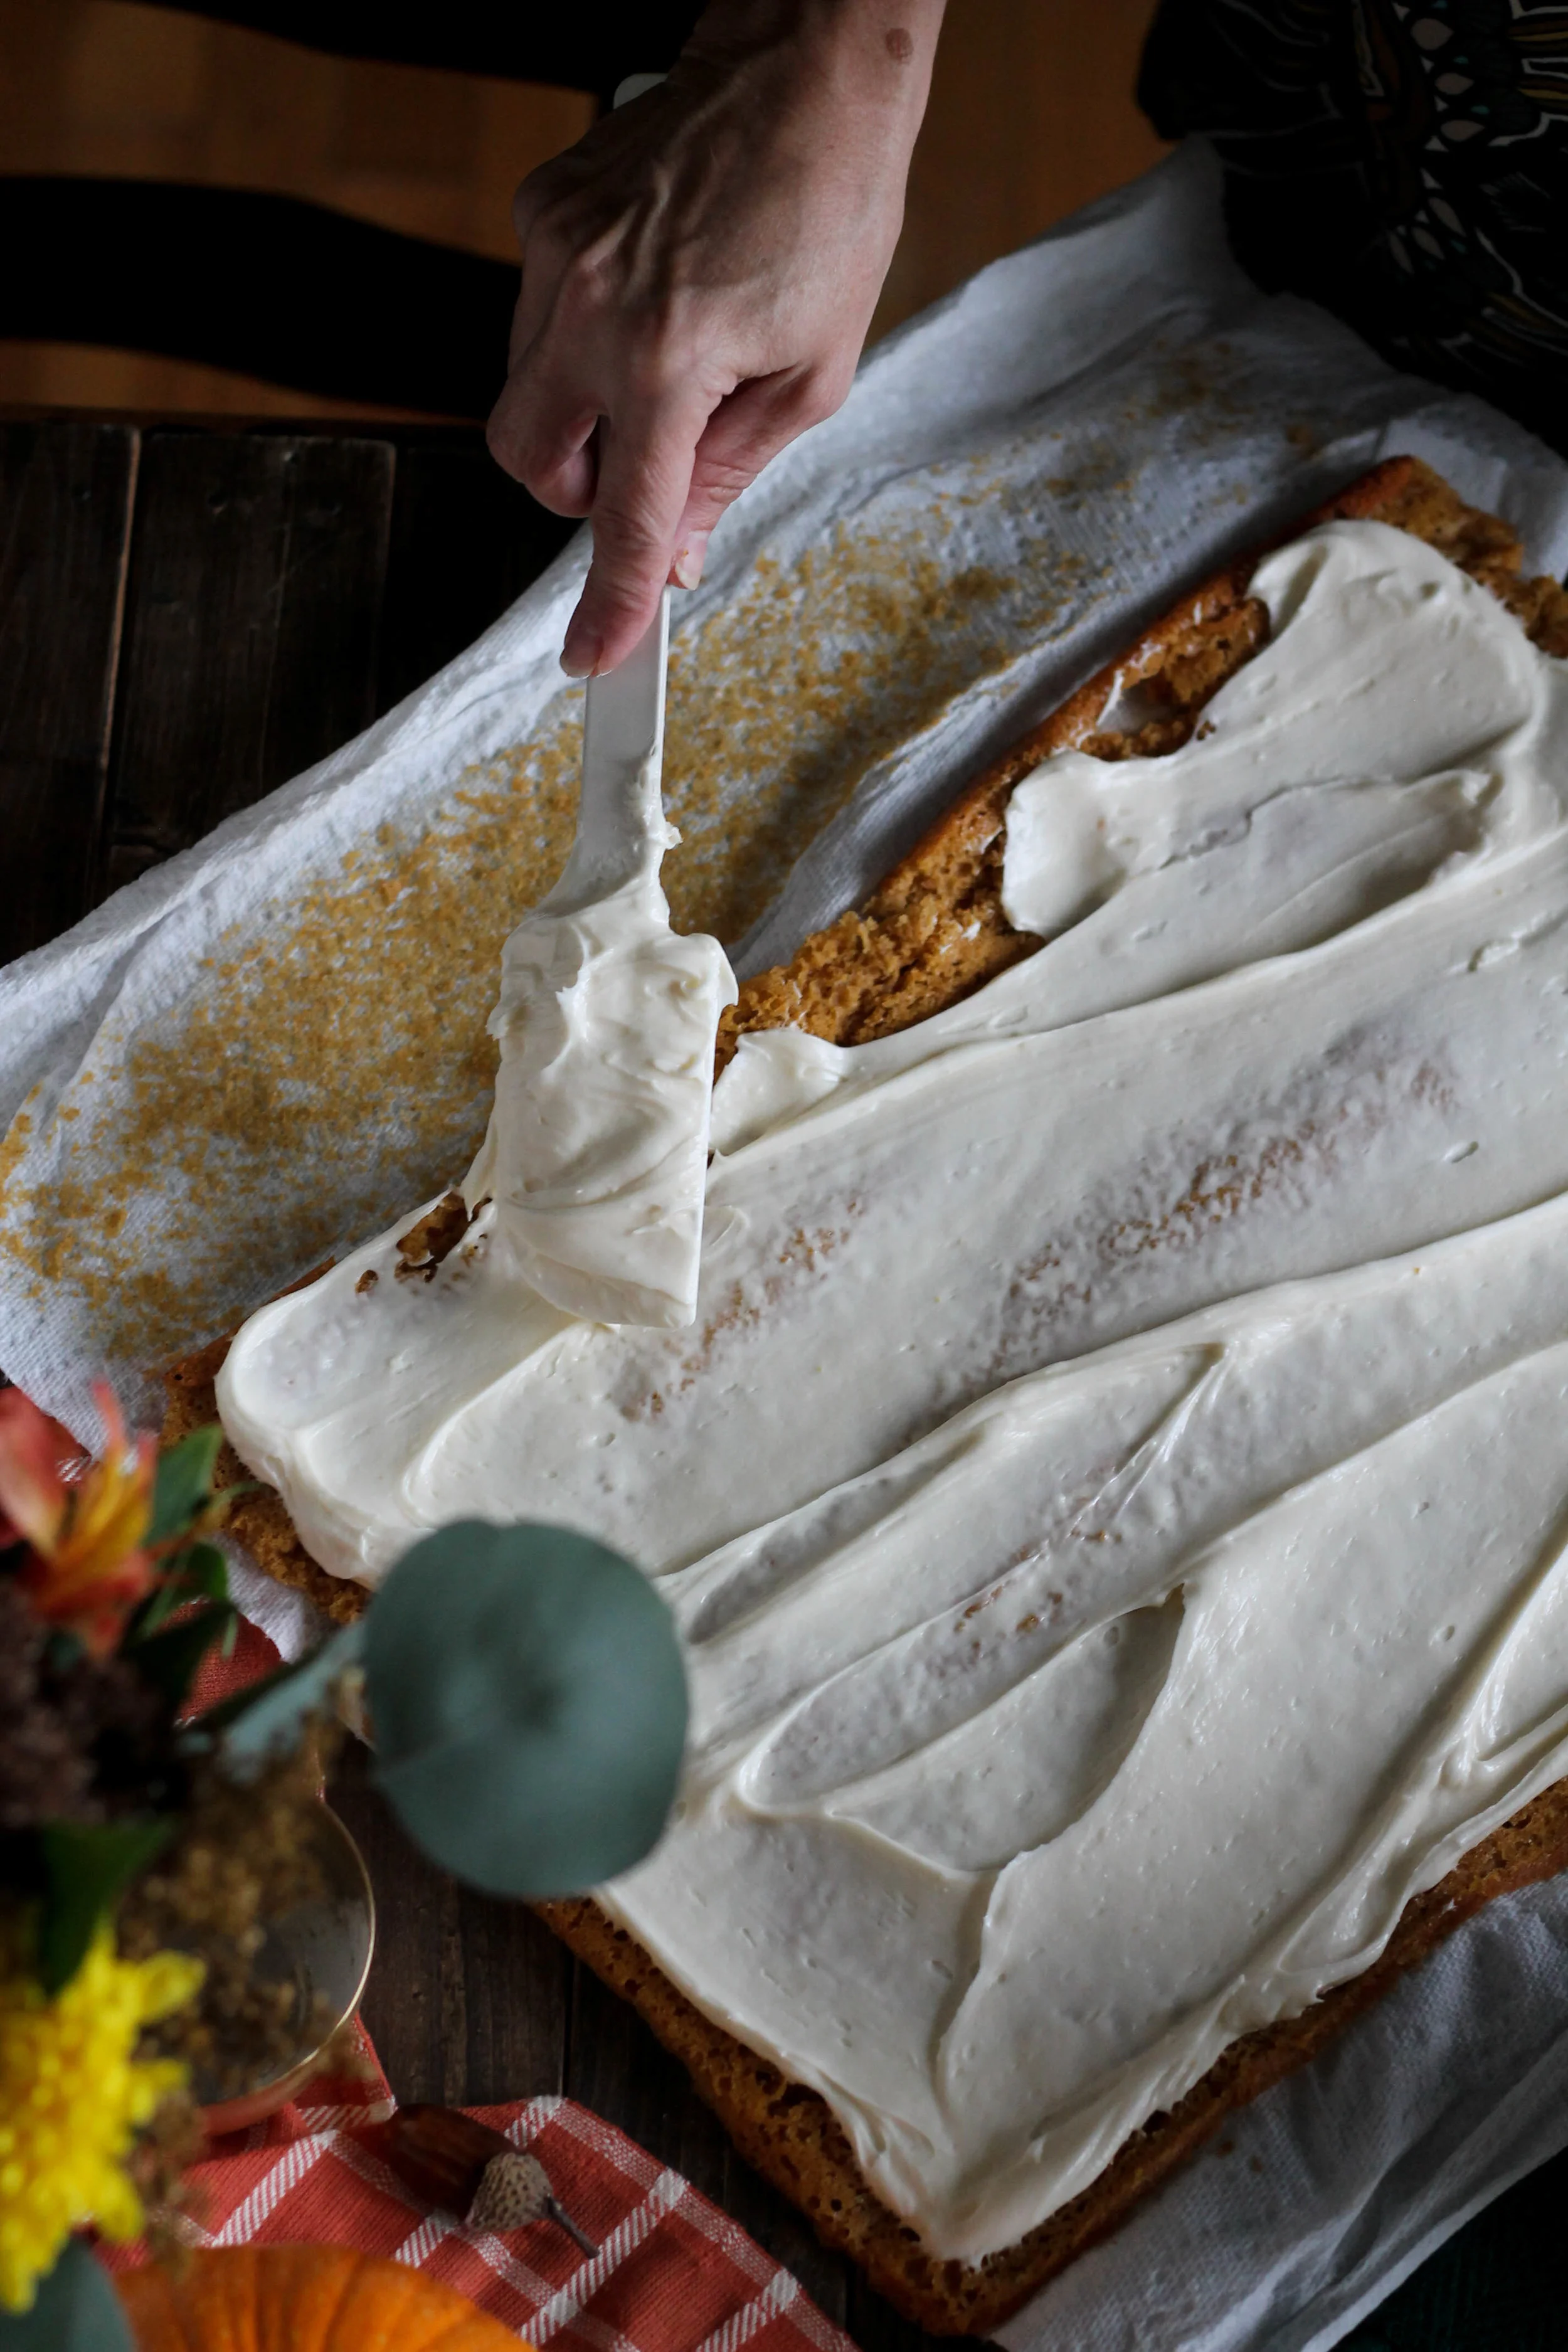
Unroll the cooled pumpkin roll and spread the cream cheese frosting evenly over the face of the roll.  

Re-roll the cake, in the same direction as before.

At this point, you may cut the roll into slices or cover in plastic wrap and refrigerate until ready to serve.  Personally, I think they are best when served cold.  Just before serving, dust with confectioner’s sugar.  Enjoy! 

Alternatively, you may wrap the roll in plastic wrap, then cover with a layer of wax paper, and freeze for up to three months. 


Brie & Thomcord Grape Grilled Cheese

I just put a handful of grapes on your sandwich... Don't be mad. 

Brie & Thomcord Grape Grilled Cheese {Pedantic Foodie}

I made this sandwich about forty minutes before rushing out the door to a dress appointment. After making and photographing the sandwich, I was left with exactly enough time for 1.5 bites before I had to leave.  It was not a happy parting, but I came home and finished it cold because it was just that good.   

Brie & Thomcord Grape Grilled Cheese {Pedantic Foodie}

This sandwich...oh, this sandwich, it is really and truly wonderful.  I want to eat it every day. 

Brie & Thomcord Grape Grilled Cheese {Pedantic Foodie}

When my family first moved into the house that they have lived in for the past eleven years and counting, we had a grapevine.  It was rather pathetic, truth be told, but it produced several pounds of nearly-black baubles each summer, until it finally gave up its efforts and shriveled away.

My siblings and I could not get enough of those deep, dusty grapes.  We would squeeze each fruit between our dirty fingers and pop the soft insides out of their skins and into our mouths. The skins were too tough to be enjoyable, and they provided a wrapper of protection from the grime of summer days that lay upon our hands.  With a mouthful of small, brown seeds, we would engage in a seed-spitting competition.  You see, we were all very sophisticated. 

The flavor of those sun-warmed grapes has never escaped my memory, and when I discovered Thomcord grapes last year, the nostalgia rushed through my mind, flooding my senses with sweet familiarity.

I love red grapes with cheese and charcuterie, but there is something about those gem-like, black Concords that captures my heart.  Thomcord grapes are a cross between Concord and Thompson grapes, and they possess all the charm of Concords without the pesky seeds and tough skins.

Brie & Thomcord Grape Grilled Cheese {Pedantic Foodie}

Through some very tedious experimentation (read: eating and more eating), I found that they pair really, really well with brie.

Brie & Thomcord Grape Grilled Cheese {Pedantic Foodie}

It's okay, you can roll your eyes, I know I'm obsessed with brie - but this really is SO GOOD!

Brie & Thomcord Grape Grilled Cheese {Pedantic Foodie}

So let's run through this again.  Homemade bread + caramelized onions + melty, creamy brie + sweet and crunchy grapes = happiness.  That's math.  You can't argue with math. 

Brie & Thomcord Grape Grilled Cheese {Pedantic Foodie}

The best part about this sandwich is the contrast between the crispy, buttered bread, the rich brie, and then the sharpness of the still-cool, crunchy grapes.  

Brie & Thomcord Grape Grilled Cheese {Pedantic Foodie}

Lunch is served.

Sincerely, 

Pedantic Foodie


Grape & Brie Grilled Cheese

makes 2 sandwiches

for the caramelized onions

- 1 tablespoon unsalted butter

- 1/2 medium sweet onion, sliced

- 3/4 teaspoon salt 

- 1/2 teaspoon balsamic vinegar 

- 1/2 tablespoon honey

In a small, nonstick frying pan, melt butter over medium heat.  Add onions and salt, and cook until the onions are translucent and have begun to brown on the edges.  About 5-8 minutes. 

Add balsamic vinegar and cook until the onions are deep in color and caramelized.  Just before removing the onions from heat, add the honey.  

for the sandwiches

- 4 thick slices multigrain bread

- 4 tablespoons unsalted butter, softened 

- 1 cup Thomcord grapes

- 6-8 ounces double cream brie

Place a medium, nonstick frying pan over medium heat. 

Spread a layer of butter on one side of each slice of bread.  Cover two slices of bread with caramelized onions and the remaining two slices with sliced brie.  Press the grapes into the brie and place the sandwich halves together.

Cook the sandwiches in the skillet for about 4 minutes on each side, until crisp and golden.  Serve immediately.  Enjoy! 


A Study in Multigrain Bread

For about two and a half years I would wake up every Monday and Tuesday morning and leave for a very dear friend's home to tutor her two very dear sons.  It was one of several small jobs I held at the time, but was truly only a "job" by definition.  

A Study in Multigrain Bread {Pedantic Foodie}

In truth, going to her house was like visiting a spa - it was a two to three hour retreat where I was able to read some of the most charming children's literature to very eager listeners.  We did math and grammar, and such necessary subjects as well, but in her home - where the room was cozied by a lit candle and Vivaldi's serenades. 

A Study in Multigrain Bread {Pedantic Foodie}

As we begun our work, I would hear the whistle of the kettle from downstairs and in no time there would be a steaming brew set before me on a tray, that would feature chocolate and fresh berries, homemade cookies, or, my very favorite - homemade bread.

I know you may be tempted to be annoyed by the heavenly description of this unrealistic work situation, and I am well aware of how spoiled I was.  My work is often more chaotic these days but the memories of those cozy mornings were often the brightest parts of my week.

Now that my dear friend is no longer a twenty-minute drive away, I am left to my own resources when the cravings for a simple, hearty bread come.

A Study in Multigrain Bread {Pedantic Foodie}

Let's talk about bread-baking for a minute, shall we?  

Over the summer, I began reading through another one of Peter Reinhart's works of culinary genius and learned a bit more about bread-baking.

A Study in Multigrain Bread {Pedantic Foodie}

I brought few bits of bread-baking knowledge to the table before picking up this book, the greatest of these being that before attempting any bread recipe, you must buy yourself a kitchen scale.  In my mind, a scale is just as vital to bread as the yeast.  And believe me, once you own a scale, you will find that it comes in handy far more than you would imagine. 

Peter taught me a couple of other tricks to bread success.  An instant read thermometer and instant yeast.  I bought both, and I have loved both.  Here is why.

If you have ever invested hours of your day to make a loaf of bread only to slice into it and realize that your beautiful labor of love is raw in the center, you know the heart-sinking feeling I am talking about.  Instant-read thermometers can eliminate such soul-crushing disasters by ensuring consistently perfect loaves every darn time.

A Study in Multigrain Bread {Pedantic Foodie}

Doesn't that make your baker's heart happy?  Mine too. 

Instant yeast is also our friend because it gets the job of rising done with less yeast required, has a longer shelf life than your typical active dry varieties, and can be added right into the flour without having to hydrate it first.  In short, it just simplifies things.  

A Study in Multigrain Bread {Pedantic Foodie}

When I first set out to make my own multigrain bread, I did not yet realize that it was necessary to examine my intentions for this loaf's future before I began mixing, rising, and kneading.

As I discovered, there is not simply one form of multigrain bread.  Oh no, there are the soft, tender loaves that you devour, slice after slice, warm from the oven, with many oversized pats of sweet, yellow butter. 

There are also hefty, sturdy, loaves of grain-studded heartiness that stand up to any pile of ham, cheese, and mayonnaise that your men folk might pile onto them. 

A Study in Multigrain Bread {Pedantic Foodie}

Both are great, both have their purposes, and both come from quite the same ingredients.  The secret is in the ratios. 

A Study in Multigrain Bread {Pedantic Foodie}

Yep, that's right, we are going to get technical for a moment.  This is my favorite part of baking so do not be surprised at the slightly evil-scientist sparkle in my eyes. 

A Study in Multigrain Bread {Pedantic Foodie}

The difference lies entirely in the flours.  Oh, you thought flour didn't matter?  It's all the same thing?  As I have learned through many many loaves of experience, flours have specific purposes, and it would behoove us all to pay more attention to those little labels before we begin baking. And here is why. 

A Study in Multigrain Bread {Pedantic Foodie}

Bread flour.  Bread flour has a high gluten-content, which not only means that it makes my sister really sick, it also means that recipes with bread flour will result in a very chewy loaf - the kind of loaf that is best held on one's palm as the butter drips down to your elbow.

Whole wheat flour, on the other hand, has a much lower gluten content and will create a much denser, firmer bread.  The kind that will hold up to any array of sandwich accouterments.

A Study in Multigrain Bread {Pedantic Foodie}

When it is all said and done, both of these breads are equally delicious, and each has its own unique charms and qualities. 

There is nothing better on this earth than a kitchen fragrant with the smell of yeasty bread and a  slice of warm, buttered bread in hand. 

A Study in Multigrain Bread {Pedantic Foodie}

Sincerely, 

Pedantic Foodie


Multigrain Bread [Soft & Chewy]

recipe adapted from The Bread Baker's Apprentice

Baker’s Note:  This bread begins with a soaker.  This might seem a little daunting - like you are entering an entirely new level of baking - but it is simple!  I promise!  During the testing process I had approached this recipe with trepidation, but my fears were put to rest after the first trial.  It is just a simple step that adds great depth to your bread and make you feel pretty accomplished too. 

for the soaker

- 3 tablespoons millet 

- 3 tablespoons rolled oats 

- 2 tablespoons wheat bran

- 1/4 cup filtered water

The day before you plan on baking your bread, prepare the soaker.  Combine millet, rolled oats, wheat bran in a small bowl and cover with water.  Stir just to combine and cover with plastic wrap.  Leave the bowl at room temperature and allow to sit overnight. 

for the dough

- 13.5 ounces bread flour (you may need to increase this amount up to 5 ounces more, in order to bring the dough together) + extra for rolling and shaping

- 3 tablespoons brown sugar

- 1 1/2 teaspoons salt 

- 1 tablespoon instant yeast 

- 1 1/2 tablespoons honey

- 1/2 cup buttermilk 

- 3/4 cup filtered water, room temperature 

- nonstick spray

- 2 teaspoons rolled oats 

- 1 teaspoon wheat bran

In the bowl of your stand mixer, combine flour, sugar, salt, and yeast.  Add in your prepared soaker, along with the honey, buttermilk, and water.

Fit your mixer with the paddle attachment and mix on low speed until the ingredients form a ball.  If the dough is not coming together, add up to 5 ounces of extra bread flour.  

Transfer the dough to a well-floured countertop and read for about 12 minutes, sprinkling with flour as needed.  The dough should be pliable, but not sticky.  Alternately, you can knead the dough in your stand mixer with the dough hook.  Knead for 10 minutes in the mixer and then finish by kneading for an additional 2 minutes by hand.

At the end of the kneading process the dough should pass the windowpane test and should read at 77 to 81 degrees F. 

Coat a large bowl with nonstick spray and place the dough in the bowl; turn to coat.  Cover with plastic wrap and allow to rise at room temperature for 90 minutes; until the dough has doubled in size. 

Turn the dough out unto a well-floured surface and punch it down gently.  Use a rolling pin to shape the dough into a rectangle.  It should be 3/4-inch in thickness, 6 inches wide, and 8 inches long.  Form the dough into a load by folding in the two ends of the rectangle, as if you were forming an envelope.  Place the dough into a 9x5 loaf pan that has been greased with nonstick spray and lined with parchment paper. 

Spray the top of the loaf with nonstick spray and sprinkle with rolled oats and wheat bran.  Cover loosely with plastic wrap and allow to proof for 90 minutes, or until the loaf has just about doubled in size.  

Preheat oven to 350 degrees F. 

Bake the bread for 25-40 minutes, until the top of the loaf is deep golden brown and the internal temperature of the loaf reads at 185-190 degrees F. 

Place the loaf on a cooling rack to cool for one hour, or until your senses can no longer stand the anticipation.  Enjoy!

Multigrain Bread [Hearty Sandwich Bread]

recipe adapted from The Bread Baker's Apprentice

for the soaker

- 3 tablespoons millet 

- 3 tablespoons rolled oats 

- 2 tablespoons wheat bran

- 1/4 cup filtered water

The day before you plan on baking your bread, prepare the soaker.  Combine millet, rolled oats, wheat bran in a small bowl and cover with water.  Stir just to combine and cover with plastic wrap.  Leave the bowl at room temperature and allow to sit overnight.

for the dough

- 10 ounces bread flour (you may need to increase this amount up to 4 ounces more, in order to bring the dough together)

- 3.5 ounces whole wheat flour 

- 3 tablespoons brown sugar

- 1 1/2 teaspoons salt 

- 1 tablespoon instant yeast 

- 1 1/2 tablespoons honey

- 1/2 cup buttermilk 

- 3/4 cup filtered water, room temperature

- nonstick spray

- 2 teaspoons rolled oats 

- 1 teaspoon wheat bran

In the bowl of your stand mixer, combine flours, sugar, salt, and yeast.  Add in your prepared soaker, along with the honey, buttermilk, and water.

Fit your mixer with the paddle attachment and mix on low speed until the ingredients form a ball.  If the dough is not coming together, add up to 5 ounces of extra bread flour.  

Transfer the dough to a well-floured countertop and read for about 12 minutes, sprinkling with flour as needed.  The dough should be pliable, but not sticky.  Alternately, you can knead the dough in your stand mixer with the dough hook.  Knead for 10 minutes in the mixer and then finish by kneading for an additional 2 minutes by hand.

At the end of the kneading process the dough should pass the windowpane test and should read at 77 to 81 degrees F. 

Coat a large bowl with nonstick spray and place the dough in the bowl; turn to coat.  Cover with plastic wrap and allow to rise at room temperature for 90 minutes; until the dough has doubled in size. 

Turn the dough out unto a well-floured surface and punch it down gently.  Use a rolling pin to shape the dough into a rectangle.  It should be 3/4-inch in thickness, 6 inches wide, and 8 inches long.  Form the dough into a load by folding in the two ends of the rectangle, as if you were forming an envelope.  Place the dough into a 9x5 loaf pan that has been greased with nonstick spray and lined with parchment paper. 

Spray the top of the loaf with nonstick spray and sprinkle with rolled oats and wheat bran.  Cover loosely with plastic wrap and allow to proof for 90 minutes, or until the loaf has just about doubled in size.  

Preheat oven to 350 degrees F. 

Bake the bread for 25-40 minutes, until the top of the loaf is deep golden brown and the internal temperature of the loaf reads at 185-190 degrees F. 

Place the loaf on a cooling rack to cool for one hour, or until your senses can no longer stand the anticipation.  Enjoy!